Tuesday, February 28, 2012

Finding Art Ministry - Idealism

Idealistic vs Realistic.  This was a theme I explored in one of my art appreciation classes in college.  It gave way to my favorite piece that I have created, even though I didn't actually do the artwork.  Let me explain!  I transposed various works of art that I felt depicted an idealistic world onto plexiglass.  On other pieces of plexiglass I incorporated various photographs of real life.  Using screws of different lengths, I attached the different pieces of plexiglass to form an Idealistic vs Realistic wall sculpture.  Loved it!!  At the time I lived at home and did not have the vision to keep the piece - sadly it was taken apart :(

I got to thinking about this sculpture today and decided to revisit one of the paintings I had selected that represented an idealisitc life.  The philosophy of idealism is to represent things as you would like them to be, rather than how they actually are.  I believe it is human nature to have a "grass is greener" attitude. 

This tendancy to fantasize about how life could be was prevelant in art during the Rococo movement of the 18th century.  Artists of this time were drifting away from the dark, rich works of the Baroque period and moving towards a lighter, more playful and colorful elements.  Most often cherubs, myths of love and high society were painted.
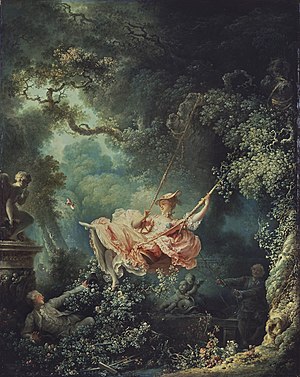


The Swing, painted by Jean-Honore Fragonard in the 18th century, is considered one of the masterpieces of the Rococo movement.  This painting depicts a young lady being pushed on a swing; while a gentleman hides in the bushes to catch glimpses of her.  Cupids and cherubs appear in the lush garden - portraying the playfulness and fantasy of this time.  The overall image showcases an idealistic life - however the meaning behind the work is one of deceit and betrayal.  On the surface we see what appear to be lovers, the girl and the young man hiding in the greenery.  It is believed the man in the shadows pushing the girl is actually her husband; and she is betraying him by allowing the young man to look up her skirt. 

This painting is an excellent example of the culture of 18th century France.  I love how at first glance it gives the illusion of the perfect life - but when you dig deep and look into the shadows you see real life.  The grass may look greener; but there could be slugs and mold growing in the shadows!

Friday, February 24, 2012

February Weddings - Timeless Beauty

Queen Victoria is believed to have started the tradition of the white wedding gown.  She was married to Prince Albert on February 10, 1840 in the Chapel Royal of St. James Place.  While reading articles on her wedding, I thought of the perfect theme for February nuptials - Timeless Beauty!

Prior to Queen Victoria's white wedding, usually only poor brides wore white.  This was a statement that she brought nothing to the marriage.  It also was not unusual for a bride to wear a brown or light green dress; or even their Sunday best, as their wedding gown.  Early Victorian era dresses following the tradition of the Queen's white were made of organdy, tulle, lace, gauze, silk, linen or cashmere.  Bridesmaids also wore white and veils attached to a crown of flowers.  Typically the bride wore orange blossoms and the attendants wore roses.


Photo credit: royalcollection.org.uk
Painting by Franz Xaver Winterhalter of Queen Victoria in her wedding dress

Another tradition started by Queen Victoria was using myrtle in bouquets.  Prince Albert's grandmother gave a bouquet containing myrtle to Queen Victoria during a visit.  The Queen then planted some of the myrtle in her garden - where it still grows today!  The Queens daughter, Princess Victoria, was the first bride to carry myrtle in her bridal bouquet.  Every royal bride since has carried myrtle from Queen Victoria's garden in their own bouquets. 

If you can't tell - I am fascinated by royal weddings!  Especially since there is so much history behind them. I used Queen Victoria and her era as my inspiration when coming up with a theme for this month. During the Victorian era flowers were an important part of society - they even had their own flower language  Small handheld nosegays were very popular during this time.  For a Timeless Beauty wedding; I am envisioning small bouquets of ivory and chocolate roses.  All the colors of the wedding party and decorations should compliment this theme; in various shades of ivory, chocolate and gold. 

Unfortunately, I have had a lot on my plate and was not able to make my own vision for a bridal bouquet to go with my theme.  However, I was able to find a picture on the internet that coincides with my vision!

photo from preservedfloralsbylizann.com

This bouquet would be just lovely for a Timeless Beauty themed wedding!!!  Ivory and brown can be extremely elegant when done properly.  Add in some lace and it gives the entire wedding a vintage feel.  Don't be afraid to get as unique as you want with your wedding!  This is your time to shine!  :)

Tuesday, February 21, 2012

Mommy & Me Art - Thumb Print Trees Part 2!

Over the weekend I had a Mommy & Me art class at my house.  We had 3 kids plus my sister and Madailein participate.  The kids had so much fun painting!  It is such a joy to watch children paint or draw - their vivid imaginations come alive and they have a great time just exploring color and shapes.  Here are some pictures of our weekend!

Madailein getting ready for everyone!  She wanted her Mickey friends to join in the fun.

Time to get started!


Pure joy!


The finished masterpieces!


Happy crafting everyone!! 

Sunday, February 12, 2012

Thumb Print Tree

Next weekend I am leading my first ever Mommy & Me art class!  I decided we would create some thumb print paintings.  I had so much fun making my example painting today!!  I love creating whimsical works of art and using color unexpectedly.  My goal is to do one of these paintings with each of my girls and paint their names on them.  :)


I painted my background a variation of yellows and greens.  I usually don't draw out my plans on canvas - however I had a very specific idea of how I wanted the tree to look.
Once the tree was finished - the fun began!! 

Using a bright blue, I started on the thumb print leaves.  I blended a few different shades of blue so there was so variation in the leaves. 

I added the word "Family" and am very pleased with how it turned out! I plan on doing another example painting before next weekend, hopefully of a bird or peacock.  I cannot wait to see the masterpieces everyone comes up with next weekend!

Happy  Crafting! 


Wednesday, February 8, 2012

Valentine's Rose Heart Wreath

First project of the month done!  Yea!
Madailein saw a Styrofoam heart shaped wreath and Joann's and wanted to make a Valentine's decoration.  I love that she is so into arts and crafts already!

This was such an easy craft to have little ones help with.  The only materials needed are a heart shaped wreath, bunches and bunches of silk roses and side cuts.

Three simple steps:
1.  Cut the roses so they only have a small amount of stem
2.  Stick the roses into the Styrofoam wreath
3.  Hang on the door! Voila!

She was super excited to have helped me make a decoration and it turned out really cute!  We are on a roll with our crafts this month.  Next up are the embroidered fabric in frames.  I'm hoping these turn out as well as I am picturing in my crafty mind. 

Happy crafting everyone!


Sunday, February 5, 2012

February Crafting Goals

Well January came and went faster than ever before!  Life happened and I did not get nearly as much crafting done as I would have liked.  However, I did finish a place mat, start the diaper box bins and Madailein did finish her painting!

Knit place mats - I was not thrilled with the way this craft turned out, as I mentioned in a previous post.  I will definitely try it again using different color yarn. 

Diaper box bins - I am still planning on making these.  So far, I have collected 5 diaper boxes to get started on this project.  The white canvas I bought for the base was way too thin and you can see right through the fabric on the box.  As soon as I get some heavier canvas I will finish this project.

Madailein's painting - I am so proud of her beautiful work of art!  Last weekend I prepared her canvas for her, painting the background blue.  She was so excited to create her own painting for her bathroom.  The girl's bathroom is painted yellow and decorated with bright turtles, butterflies, birds, trees, etc.  Madailein decided to paint some butterflies, a turtle, a bird, flowers and lots of clouds!

Now on to February!  This month I am aiming to get a lot of crafting done for the Spring Craft Show.  Here is what is on my to do list so far:

- Heart shaped rose wreath for front door
- First Communion veils
- Embroidered fabric set in wood hoops or frames


Happy Crafting everyone!